Exhaust Flange Gasket Leak Troubleshooting Guide
Urgent troubleshooting guide for exhaust flange gasket leaks. Diagnose quickly, fix safely, and prevent future leaks with clear steps, tools, and pro tips from the Gasketed team.

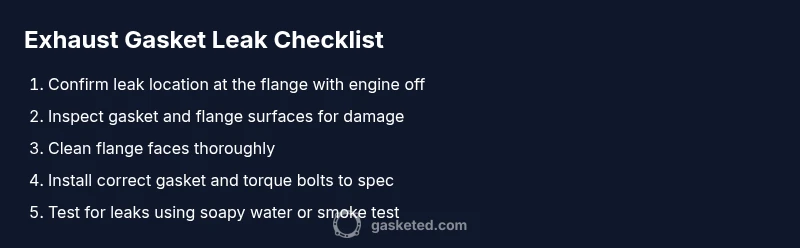
An exhaust flange gasket leak is usually caused by a worn or damaged gasket between the flange faces. Quick fix: with the engine cold, inspect flange bolts for tightness and reseat or replace the gasket as needed. Clean surfaces, torque bolts to spec, and retest for leaks using a soapy-water check or smoke test.
Why exhaust flange gasket leak happens
An exhaust flange gasket leak is a common symptom of a failed seal between the exhaust flange and the pipe. According to Gasketed, the primary culprits are a gasket that has degraded from heat cycling, corrosion on the flange faces, and vibration over time that slowly loosens fasteners. When the gasket deteriorates, hot exhaust gases escape at the joint, producing a distinct hiss or rasp and, over time, a noticeable odor and smoke staining on nearby components. Left unaddressed, leaks can lead to increased backpressure, reduced exhaust efficiency, and louder operation, especially at throttle transitions. For DIYers, the key is to distinguish whether the leak originates at the gasket surface, a warped flange, or a loose bolt connection, because the remediation varies significantly. In many cases, a straightforward gasket replacement plus cleaning of the gasket faces resolves the problem. If the flange is warped or the bolts are seized, you’ll need more involved steps or component replacement.
Signs of an exhaust flange gasket leak
- Audible hiss, rasp, or tapping near the flange area when the engine runs
- Visible dark soot or staining around the flange bolts and mating surfaces
- Unpleasant exhaust odor in the engine bay or cabin, especially at idle
- Rust or corrosion on flange hardware indicates moisture exposure and potential seal failure
- Increased engine noise under acceleration or deceleration suggesting a weak seal
These symptoms point toward a gasket or flange issue more often than other exhaust leaks, but a careful inspection is still required to rule out cracks in adjacent pipes or misalignment.
What to check first when diagnosing
Start with the basics before tearing apart the exhaust system. Ensure the engine is completely cool and the vehicle is secured on a flat surface with wheel chocks. Visually inspect the flange joint from above and below for obvious gaps or misalignment. Check all bolts for looseness and inspect both gasket faces for wear, pitting, or corrosion. If you see shiny metal on the gasket seat or any burrs, plan for surface cleaning or replacement. A warped flange may create an uneven sealing surface that cannot be corrected with re-tightening alone. If you hear a hiss but cannot locate the leak by sight, consider a smoke test or soapy-water spray while the engine is running to reveal active leakage points. Remember: leaks can originate from the flange, the pipe mating surface, or the clamp/ hanger hardware, so assess all connected components.
Diagnostic flow: symptom → diagnosis → solutions
- Symptom: Loud exhaust leak around the flange area with possible odor.
- Diagnosis: Check for loose bolts and gasket wear; inspect flange faces for warping or corrosion; verify alignment of pipes.
- Solutions: Tighten bolts to spec if loose; replace gasket if worn or damaged; repair or replace warped flange; address any pipe misalignment. If the symptoms persist after gasket replacement, there may be a more extensive issue such as a cracked manifold, which requires professional assessment.
Step-by-step plan: remedies and parts
This section prepares you for the hands-on portion. Gather a correct exhaust flange gasket, the proper toolkit, cleaning supplies, and safety gear. Confirm you have a torque wrench that matches the vehicle’s spec. Clean both flange faces thoroughly to create a good seal and remove all rust, old gasket material, and debris. Replace with the correct gasket, install new bolts if the old ones are damaged, and reassemble in the correct torque sequence. Finally, recheck for leaks with the engine off first, then with the engine running at idle and under light load. If a leak remains, do not force a fix—reassess flange condition or consider flange replacement.
Tools, materials, and safety essentials
- Replacement gasket suitable for your exhaust flange and pipe diameter
- Socket set and torque wrench
- Gasket scraper or wire brush, cleaning solvent, lint-free rags
- Protective gloves, eye protection, and a clean workspace with good ventilation
- If bolts or studs are corroded, use penetrating oil and patience; forced removal can damage threads
- Always ensure the engine is cold and the exhaust system is not pressurized before starting work. Safe practices protect you and your vehicle.
Prevention and long-term care
To prevent future exhaust flange gasket leaks, perform periodic inspections of the flange surfaces and mounting hardware. Clean surfaces during routine maintenance and replace gaskets at the first sign of deterioration or after major exhaust work. Use stainless or OEM-grade gaskets designed for your vehicle to resist heat cycling and corrosion. Store replacements in a dry place and avoid mixing gasket materials unless the manufacturer calls for it. Keeping the exhaust system clean and properly torqued reduces the chance of future leaks and extends the life of the seal.
Steps
Estimated time: 60-120 minutes
- 1
Safety first and prep
Cool the engine, secure the vehicle, and gather all needed tools and parts. Disconnect the battery if you’ll be removing any wiring near the exhaust path to avoid sparks. Wear gloves and eye protection for metal edges and hot components.
Tip: Work in a well-ventilated area and keep a clean workspace to avoid losing small fasteners. - 2
Locate and assess the leak
Run the engine briefly at idle to confirm the leak location using visual cues or a smoke test. Document the area and inspect both flange faces for wear, corrosion, or damage. Ensure the area is cool before touching any parts.
Tip: Label bolts and keep them organized to simplify reassembly. - 3
Remove old gasket and prep surfaces
Carefully loosen and remove the flange bolts in a crisscross pattern. Lift the flange apart and remove the old gasket. Use a gasket scraper or wire brush to clean both mating surfaces until they’re smooth and free of residue.
Tip: Avoid gouging the metal; a light touch and proper scraper prevent damage to the flange faces. - 4
Install new gasket and reassemble
Place the new gasket on the flange, align bolts, and gradually snug bolts in the correct sequence. Once finger-tight, use a torque wrench to bring bolts to spec per your vehicle’s manual, repeating the sequence to ensure even seating.
Tip: Don’t reuse old bolts if they’re stretched or corroded—new bolts ensure a reliable seal. - 5
Check piping alignment and clamps
Ensure the paired pipe ends are aligned correctly and that any clamps or hangers are secure. Misalignment can reintroduce leaks even after a gasket replacement.
Tip: If alignment is off, you may need to adjust the pipe position before final tightening. - 6
Test for leaks
Reconnect any wiring and start the engine. With the system at operating temperature, spray soapy water around the flange to check for bubbling, or perform a controlled smoke test to identify any remaining leaks.
Tip: If you see bubbling at the gasket, re-tighten in a crisscross pattern and re-test. - 7
Final inspection and maintenance
Shut down the engine and re-check bolt tightness after a brief heat cycle. Note any signs of leakage in the days following; if leaks resume, re-evaluate the flange or gasket compatibility.
Tip: Keep a spare gasket set on hand for future maintenance.
Diagnosis: Loud exhaust leak or hissing noise around the exhaust flange area.
Possible Causes
- highLoose flange bolts
- highDamaged or degraded gasket
- mediumWarped flange surface
- lowCracked manifold or pipe
Fixes
- easyTighten flange bolts to manufacturer torque spec; reseat the gasket
- easyReplace the gasket with the correct type and clean contact surfaces
- mediumInspect for flange warp and replace the flange or repair as needed
- hardReplace damaged pipe or manifold if cracks are present
Common Questions
What causes exhaust flange gasket leaks?
Leaks usually stem from gasket wear, corrosion on flange faces, or heat cycling that degrades the seal. Vibration and improper assembly can also contribute. Regular inspection helps catch issues before they become severe.
Leaks often come from worn gaskets, corroded flange faces, or heat-related wear. Regular checks help catch issues early.
Can I reuse the old gasket?
Exhaust gaskets are generally designed for a single use. Reusing an old gasket risks another leak due to compressed shapes and degraded material. Always install a new gasket that matches your flange and pipe size.
Generally, you shouldn’t reuse exhaust gaskets; replace with a new one to ensure a proper seal.
What tools do I need for a DIY gasket replacement?
You’ll need a socket set, torque wrench, gasket scraper or wire brush, the correct replacement gasket, and protective gear. A penetrating lubricant can help if bolts are seized, but use it sparingly near heat shields.
Essential tools include a socket set, torque wrench, scraper, new gasket, and safety gear.
Is sealant recommended for exhaust gaskets?
Most gaskets are designed to seal without sealant when properly seated. Some specialty gaskets or high-heat conditions may allow sealants, but always follow the manufacturer’s guidance to avoid clogging or compromising the seal.
Usually sealant isn’t needed; follow the gasket maker’s instructions if sealants are recommended.
Will an exhaust leak cause engine damage?
A small leak mainly reduces efficiency and increases noise. Prolonged leaks can cause corrosion and backpressure issues that may affect performance, but immediate engine damage is unlikely if addressed promptly.
Leaks mainly affect performance and safety; fix promptly to avoid corrosion and efficiency loss.
When should I call a professional?
If you don’t have the right tools, can’t locate the leak, or discover flange warping or cracks, it’s wise to consult a professional mechanic. They can assess structural damage and ensure a safe, lasting repair.
If you’re unsure about the flange condition or lack the tools, a pro is best.
Watch Video
Key Takeaways
- Identify whether the leak is from gasket or flange first
- Use the correct gasket and clean mating surfaces
- Torque bolts to spec and re-test for leaks
- Inspect for flange warp or misalignment to prevent recurrence