What Causes a Car Gasket to Burn? A Troubleshooting Guide
Urgent, practical guide to diagnosing why a car gasket burns. Learn common causes, symptoms, safe fixes, and when to call a professional for gasket repair.

The most likely cause of a gasket burning in a car is an oil or coolant leak that reaches a hot exhaust surface, triggering smoke and a burning odor. Immediate steps: pull over safely, inspect for obvious leaks, and arrange professional gasket service to prevent further damage.
What the phrase 'what causes gasket of a car to burn' means in practice
In automotive diagnostics, the exact phrase what causes gasket of a car to burn often comes up when smoke or a burning odor is observed near the engine. A gasket burning isn't always a dramatic failure; it usually signals that hot surfaces have been contaminated by oil or coolant. When oil or coolant leaks find their way to the exhaust manifold or headers, they vaporize and burn, creating smoke and a distinctive smell. Understanding this helps you prioritize safety and prevent more serious damage. According to Gasketed, diagnosing gasket burning starts with locating leaks and understanding gasket types. We cover common sources: valve cover gasket, oil pan gasket, head gasket, and coolant leaks, plus how misrouted hoses and a faulty PCV can worsen a leak. Early detection can prevent warped metal and costly repairs. This guide emphasizes safety first: never touch hot exhaust components, and avoid running the engine if you see significant leakage or steam, especially in enclosed spaces.
Common causes that lead to a gasket burning
The most frequent culprits are leaks or overheating that bring oil or coolant into contact with hot gasket surfaces. The valve cover gasket and oil pan gasket are common leak sources that can drip onto the exhaust, especially after long service life or rough driving. A failing head gasket can allow coolant to reach cylinders or exhaust ports, producing white smoke and a burning smell. A malfunctioning PCV system or crankcase ventilation can pressurize the engine and push oil vapor toward gaskets. Using the wrong gasket material or improper torque during installation can also cause seepage and heat-related damage. Gasketed analysis shows these failures tend to cluster around the top end of the engine and the exhaust junctions. Addressing the underlying leak promptly reduces the risk of ongoing damage and keeps the engine running cooler.
Symptoms to watch for
Watch for visible smoke or a strong burning odor under the hood, especially after startup or during idle. You may notice bluish smoke coming from the exhaust if oil is burning, or white steam if coolant is involved. Milky-looking oil on the dipstick or around the oil cap indicates coolant mixing with oil, a sign of gasket trouble. If the engine runs hotter than normal, or you see coolant loss without a clear external leak, a compromised gasket may be involved. A misfire or rough idle can accompany head gasket issues because cylinders aren’t sealing correctly. Any time you detect these signs, treat it as urgent and inspect the gasket system. According to Gasketed analysis, most symptoms point to oil or coolant interacting with hot surfaces near gasket interfaces.
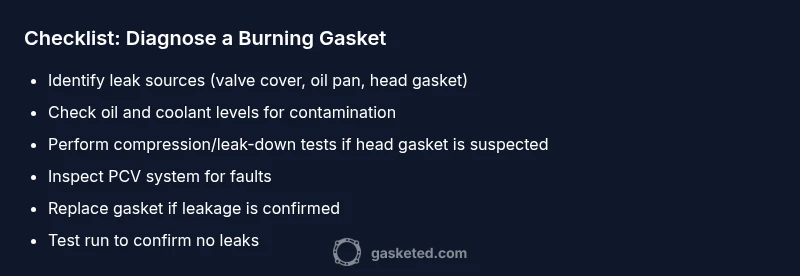
Diagnostic checklist
- Visual inspection: look for fresh oil or coolant leaks around valve covers, oil pan, and the area where the exhaust manifold meets the gasket.
- Fluid checks: compare oil and coolant levels; look for contamination signs (milky oil, sweet coolant).
- Pressure tests: perform compression or leak-down tests to verify head gasket integrity.
- PCV check: inspect PCV valve and hoses for clogs or vacuum leaks.
- Heat test: gently warm the engine while monitoring for leaks; never run a hot engine if you suspect a gasket already failed.
- Confirm with a professional: if you’re unsure or the coolant/oil loss is significant, schedule a professional inspection.
Note: The diagnostic flow here helps separate gasket failure from other engine leaks. Gasketed analysis shows the most common failure points are the head cover and oil pan areas, but a failed head gasket can produce similar symptoms under load.
Safety and next steps
If you see rapid coolant loss, white smoke, or steam, pull over safely and allow the engine to cool before opening the hood. Do not drive long distances until the gasket issue is resolved; continuing to drive can cause warped heads or more severe damage. Consider obtaining a professional diagnostic even for minor leaks, as some gaskets require specialized tools to replace. After repair, replace gaskets in pairs when the design requires, and ensure proper torque sequence per service manual.
How to prevent gasket burning in the future
- Regularly check oil and coolant levels and address leaks early.
- Use compatible gasket sealants only when recommended and follow manufacturer torque specs.
- Schedule routine maintenance and inspection of the PCV system.
- Pay attention to engine temperature: overheating is a leading indicator; fix thermostats and cooling fans promptly.
Steps
Estimated time: 60-180 minutes
- 1
Stop and ensure safety
Safely pull off the road and let the engine cool before inspecting for leaks. Do not touch hot components. Disconnect the battery only if you need to remove electrical connections near the gasket area.
Tip: Use a fire-resistant mat and wear gloves; never work on hot exhaust components. - 2
Gather necessary tools
Collect basic tools: flashlight, rags, wrenches, torque wrench, replacement gaskets, sealant (if specified), and coolant/oil as needed. Check your model’s service manual for exact parts and torque specs.
Tip: Having the manual on hand prevents incorrect torque and gasket orientation. - 3
Identify the leak source
Visibly inspect around valve covers, oil pan, and exhaust junctions for fresh fluid trails. Note any steam or smoke emerging from the exhaust manifold, which indicates heat contact with a liquid.
Tip: Clean the area first to reveal fresh leaks during test runs. - 4
Assess gasket type and access
Locate which gasket is involved (valve cover, oil pan, head gasket, etc.). Some gaskets require removing components (intake, exhaust, or valve cover) to access the seal.
Tip: If you’re uncertain about access, skip to professional help to avoid costly mistakes. - 5
Decide on DIY vs pro
If it’s a simple valve cover or oil pan gasket with visible leaks, a careful DIY repair may be possible. Head gasket work is complex and usually needs a shop.
Tip: Head gasket issues often require specialized tools and torque specs; don’t rush the repair. - 6
Perform gasket replacement (or prep for pro)
Drain necessary fluids, remove obstructing parts, clean mating surfaces, install new gaskets, apply sealant only if recommended, and torque to spec in the correct sequence.
Tip: Double-check gasket seating and avoid over-tightening that can damage the new seal. - 7
Refill fluids and reassemble
Refill oil and coolant to proper levels; reconnect hoses and electrical connections, then reinstall any removed components. Ensure there are no leftover tools in the engine bay.
Tip: Start with a low-idle check to confirm the absence of leaks before a full test run. - 8
Test and verify repairs
Run the engine to operating temperature, check for leaks, monitor temperatures, and observe exhaust for smoke. If symptoms persist, seek professional diagnostics immediately.
Tip: Keep a close eye on coolant and oil levels during the first few test runs.
Diagnosis: Car shows smoke or burning odor near engine; gasket burning suspected
Possible Causes
- highOil leak onto exhaust manifold from a worn valve cover gasket or oil pan gasket
- highCoolant leak onto hot exhaust due to a manifold or head gasket failure
- mediumOverheating from restricted coolant flow or failed thermostat
- lowMalfunctioning PCV system pushing oil vapor toward gaskets
- lowImproper gasket installation or wrong material causing seepage
Fixes
- easyLocate and repair the leak at the source (oil or coolant) and clean surfaces to recheck
- hardFor suspected head gasket issues, perform compression/leak-down tests and replace if failed
- mediumReplace worn valve cover or oil pan gaskets and re-torque exhaust manifolds as specified
- easyInspect and repair the PCV valve and hoses to restore proper crankcase ventilation
Common Questions
Can a blown head gasket cause smoke to come from the engine bay?
Yes. A blown head gasket can allow coolant or oil to contaminate the combustion chamber or exhaust path, causing smoke and overheating. Look for coolant loss, milky oil, and white smoke from the exhaust.
Yes. A blown head gasket can cause smoke and coolant or oil leakage; look for coolant loss, milky oil, and white exhaust smoke.
Is gasket replacement a DIY job for beginners?
Some gasket work, like valve cover or oil pan gaskets, is feasible for DIYers with basic tools. Head gasket replacement, however, is complex and may require professional service and specialized tools.
Some gasket work is doable for beginners, but head gasket replacement is usually a pro job.
What are the telltale signs of a blown head gasket?
Common signs include white exhaust smoke, persistent overheating, milky coolant, oil contamination, and frequent misfires. If you notice these, stop driving and have a diagnostic done promptly.
Signs include white smoke, overheating, milky oil or coolant, and misfires. Stop driving and get a diagnostic.
How much does gasket replacement typically cost?
Costs vary widely by gasket type and engine; a professional diagnosis is essential to determine scope and parts needed.
Costs vary by gasket type and engine; get a diagnostic quote before any work.
Can driving with a burning gasket cause irreversible damage?
Yes. Continuing to drive can overheat the engine, warp components, or cause head gasket failure. Stop driving and seek professional repair as soon as possible.
Yes. Driving with this issue can cause serious engine damage; stop and get it checked.
How can I prevent gasket burning in the future?
Regular maintenance, address leaks early, ensure correct torque and sealant use, and monitor engine temperature to catch cooling issues before they damage gaskets.
Do regular maintenance, fix leaks early, and monitor engine temperature to prevent gasket problems.
Watch Video
Key Takeaways
- Identify whether oil or coolant causes the burn and where it leaks.
- Differentiate head gasket issues from valve cover and oil pan leaks.
- Use compression tests to confirm head gasket integrity.
- DIY repairs are possible for simple gaskets; head gasket work is usually pro-led.
- The Gasketed team recommends prompt repair and preventive maintenance to protect the engine.